Sunday, October 20, 2019

October Soap Challenge

Slanted layers - This month's challenge was to create a slanted layer soap, rotating the mold at least once during the process. I did not attempt the chevron challenge but it does look like it would be fun.

The hardest part is choosing the right fragrance that would accelerate the soap at just the right speed. The soap needs to be fluid when poured but it also needs to set up quickly so the next layer can be poured. Time to break out the florals! During this challenge I made soap using Brambleberry's English Rose, WSP Magnolia blended with 15x orange essential oil (mmmm... love this blend!) and Brambleberry's Baby Rose. I also colored all of my layers with clays and activated charcoal. For the green, I also added a little spirulina powder.

Another hard part of this challenge was the time constraints I had to work with. To have a nice flat layer, I needed not to overmix but this also meant waiting longer for it to set. I had to make sure my remaining batter stayed fluid so I had to keep them stirred. This was doable but it took a long time and I got tired or I needed to go somewhere so I rushed things at the end and got a bit sloppy. But overall I had fun with this challenge and I made a lot of nice soap. I am afraid I am going to be like the neighbor that grows too much zucchini or I am going to have to become a compulsive hand washer to use up all this soap.

Here are some pics of some of the soap I made.
This was my first attempt. It is scented with Brambleberry's English Rose. There is a silver mica line between layers that doesn't show up well.

This one is a tribute to my love of geology. I call it "Angular Unconformity". The charcoal lines are really bad but I got some interesting textures in the different layers. This one is scented with magnolia/orange eo blend which smells heavenly but totally does not match the design.

I was in a hurry for this one. I was running out of some oils and using up some older oils I had on hand. It has some nice ingredients and the scraps I have tried so far... well this is the one that will make me a compulsive hand washer for sure. I was testing out colors and textures. I really like it even though the layers are not straight. I think it looks like a volcano.

Here are some pictures of the process I used. I mixed my lye into my oils at about 90 degrees. I barely mixed to emulsion and then split the batter into 3 large funnel pitchers.  I took one large funnel pitcher and split it into three smaller pitchers and the one by one did the layers at one angle adding the clays and the fragance and mixing with a mini mixer before pouring. Then when the parallel layers were set enough, I split up the next funnel pitcher and rotated the mold and repeated the process. The fragrance I used was Baby Rose from Bramble Berry. It worked well but I think I like the English Rose fragrance a little better.

Colors premixed

Larger mold used as a cradle

First layer poured

a second layer poured

mold has been rotated

After oven processing. The "rose petals" on the top are from leftover rose clay
Other pictures of my entry:


Photography is something I need to work on. I only have my phone to use and the lighting in my house is pretty bad. I have to search my yard for a place with good lighting that is not too bright and is neutral. Here is the place I found today where the bright sun hadn't reached  yet.
My box of soap. I think the dead weeds make a prettty neutral texture.

Stepping back a bit.

Stepping back a little more.

If I had to redo my soap, I would make some changes to the colors. The pinks were supposed to be three different shades of pink but I don't think they came out that way. I would leave the lightest pink as white and darken the darkest pink for better contrast. I am still not certain I like the green (my daughter likes it) I might have liked the top layer to be black or a dark gray instead. The top layer was rushed because I had to get to our Arts and Crafts Project 4-H meeting and needed to get the soap done. I am happy to say, I made it to the meeting on time... barely.


Sunday, September 22, 2019

September Soap Challenge

This month's challenge was to make a soap using the pipe divider swirl technique.  I actually tried this technique a couple of years ago after watching a YouTube video on it but I didn't really know what I was doing at the time. It came so-so. I almost didn't get this one done and I am finishing this up with less than 12 hours to go. I am a teacher and school is back in session so I have much less time. One thing I have learned is that for me it is not a good idea to make soap on a school night or when I am sleepy because I might do something silly like accidentally leave out one of my oils or mix up my lye numbers. During this challenge I produced a lot of rebatch material.

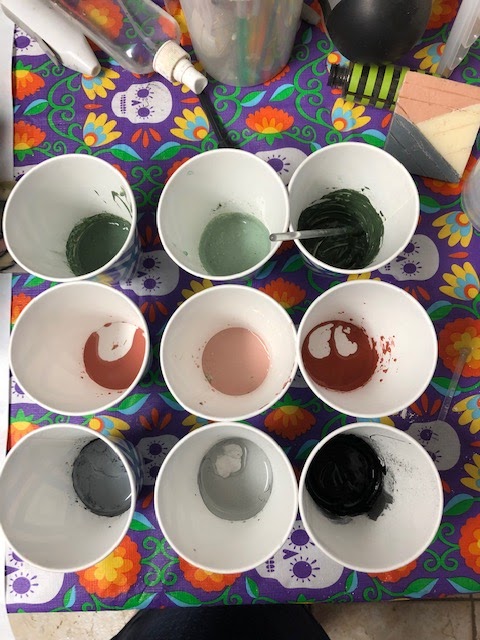
I wanted to use natural colors because I had bought a selection clays and plant powders last June and I was just itching to try them out. I had an alkanet infusion that I had going in a jar for a couple of years now. I have only used it a few times but basically I just dumped a couple of tablespoons of alkanet powder into a mason jar, filled it with olive oil and let it sit. After I used some, I just refilled it and added a little more alkanet. Other infusions I made by putting about 1-2 tbs. powder into teabags and placing them into mason jars filled with olive oil and putting them in a hot water bath in my crock pot for a couple hours. I learned this from a Soap Queen Tutorial I think. I made these infusions back in June and they had been sitting on my shelf waiting to be used. I had infusions of annatto, matcha tea, spirilina, paprika and I also tried to make an infusion with indigo but I found that indigo works better if you just use the powder mixed in oil as it doesn't infuse.


For fun, I made a layered batch of soap with each of the colors I made separated by plain soap. The bottom layer is alkanet, then annatto, the middle green layer is spirilina, then paprika and the top layer is matcha. Each layer is colored with about 15% of the oils replaced with the infusion. (All of my percents are "about" because I use a food scale that measures in 8ths of an ounce so I always adjust my amounts so that they match my scale.) I used this bar as my baseline from which to go lighter or darker. I chose not to use the paprika. In one of my throw away practices I experimented with replacing all of the olive oil with the infused oil. I liked the purple I got with the alkanet but the annatto looked like someone cracked an egg in my soap.

After playing around with the colors, I needed to make some more infusions but I was too impatient to take a even a couple of hours so I just dumped some of the powders in tea bags, put them in pans, added oil and stuck it on the stove top. Of course I wasn't paying attention and I kind of over cooked them and they smelled a little funny but they worked out ok. The new annatto was really strong and in my final soap I reduced the usage to about 8% of my oils and I still diluted the orange soap with some uncolored soap to tone it down.

The colors I chose for my soap were dark purple (33% alkanet infused oil), light purple (12 % alkanet infused oil), light green (16% matcha infused oil), Dark green (33 % spirilina infused oil with about a 1/4 tsp of indigo powder added to 2 ounces infused oil), orange (annatto) and uncolored soap. I scented my soap with a mixture of pepermint and eucalyptus.
Before the lye is added the colors look so pretty
The mold I chose has a lot of sentimental value to me. It is actually a box my father made many years ago for one of his telescope mirrors. He was an amature astronomer and he ground his own telescope mirrors and then he would pack them up and send them somewhere to have the silver part put on. The box makes a great soap mold. I wonder what he would have thought about its current use.
The recipe I used was just a basic palm, coconut, olive and castor recipe. I ran low olive oil by the time I got to my final attempt so I took what I had left in the bottle and added enough avocado oil so that my olive avocado blend was 75% olive and 25% avocado. There was quite a lot of arithmatic in planning this soap. I never used the soap calc I keep hearing about, I only learned about it recently. I have always done my calculations by hand. My soap was oven processed.

Final recipe with breakdown by container and edits from previous batches
Lined and ready to go for one of my trials
  Failed batch (lye container mix up)          

No flub ups in my final batch. I am really happy as to how it came out. Outside of the pipes I used uncolored soap, light green and a little dark green. Inside of the pipes I used orange with dark purple, light purple, uncolored soap and in the smallest pipes I used dark green. The soap in these pictures is less than 24 hours old so the colors may still be evolving.


The final mess!

Wednesday, August 21, 2019

August Soap Challenge

This month's soap challenge was to create 3 bars of soap decorated with a technique called brush embroidery. My first inspiration for my project came from the western embroidery on the Nudie suits worn by country western singers like Porter Wagoner. Much of what I liked was far too detailed to put on a small bar of soap with my limited art skills. I also came across pictures of western belt buckles that had imagery I liked.

And of course the coveted 4-H Master Showmanship belt buckle for inspiring the ultimate over the top decorations. 


This is my second time entering the soap challenge and one important thing I learned from the first time I participated was that I would need a lot of practice. I am not one of those people that amazingly get it right the first time. I didn't want to be making loaf after loaf of soap to learn this technique so I decided to make some soap "scratch paper". I cut up some old bars of soap that I had on hand and I also took some trimmings I had accumulated and made a rebatch loaf with a dark color to practice on. I cut really thin slices so I could get as much practice surface as possible. The pieces in the picture below were further cut into thinner slices.
For my first attempt I used the recipe from the tutorial substituting bee's wax for soy wax. This recipe worked well so I stuck with it. I used a piping bag with the tip cut off. I found that as the soap batter thickened, it was hard to get a round line to come out of the bag. The seam in the bag changed the shape of the opening and the soap came out more like a ribbon so for all remaining attempts I used piping tips.  I used mostly Wilton tips number 1 and 2.

I wasn't sure what brush to use so I bought a big variety pack at Michael's plus I already had some. I found that I used quite a variety of brushes for different purposes. Rounder brushes worked well on flowers flatter brushes and tiny brushes worked well on feathers. Flat stiffer brushes worked well to straighten out lines and clean up mistakes.  
Practice
Feather practice
Some of my favorite brushes
Lots of practice!
Prototypes
I now have lots of very thin bars of soap with pretty designs on them. In the soap making 101 tutorial  she made thin round bars she called soap cookies. It makes sense to me to make them thin because the design will wash off quickly and the soap will be boring and you will want to hurry up and be done with it so you can break out a brand new pretty bar of soap. I will call my bars soap crackers. I made lots of very nice soap crackers learning how to do this technique.  

I decided not to try multiple colors at this time. I really like the effect of the white on a dark color.  For my final product I made  a loaf of soap colored with indigo and scented with eucalyptus, peppermint and menthol crystals. I took one bar and sliced it thin to give me more "scratch paper" closer to the size and shape of my actual bars. When I beveled the edges, I went over them with a plastic scoop to round them like a fondant on a cake but overall the bars are a bit rough and rustic. I wanted my designs to wrap around the edges like I saw on all the cake pictures.    I also have designs on both the front and back of the bars.            

All set up to work!
The backs of the bars


The first one done!


Overall, I liked the results and this was a fun challenge. I am getting faster with practice which is good because if I ever decide to do this again, I don't think I have the patience to spend hours on just one bar of soap again. I have a large zip lock bag full of left over soap  frosting. Someone said it makes good soap dough. Maybe I will need to go check out that tutorial next...